User Management
User account management in Qalyptus Server supports multiple methods for adding and maintaining user access. The system accommodates both individual user creation and enterprise-scale directory integration for seamless user management.
User Types
Users vs Recipients
Users have full system access with:
- Assigned roles and permissions
- Login capabilities to Qalyptus Server interface
- Access to browse, create, and modify content based on role
- Integration with Qlik Sense for report generation
Recipients have limited access for:
- Receiving reports via email distribution only
- No login access to Qalyptus Server
- Ideal for external stakeholders needing reports without system access
By default, only Administrator role users can create, edit, and delete user accounts. Custom roles can be configured with user management permissions for delegated administration.
Manual User Creation
- Log in to Qalyptus Server as an administrator.
- Go to Administration> User Management > Users.
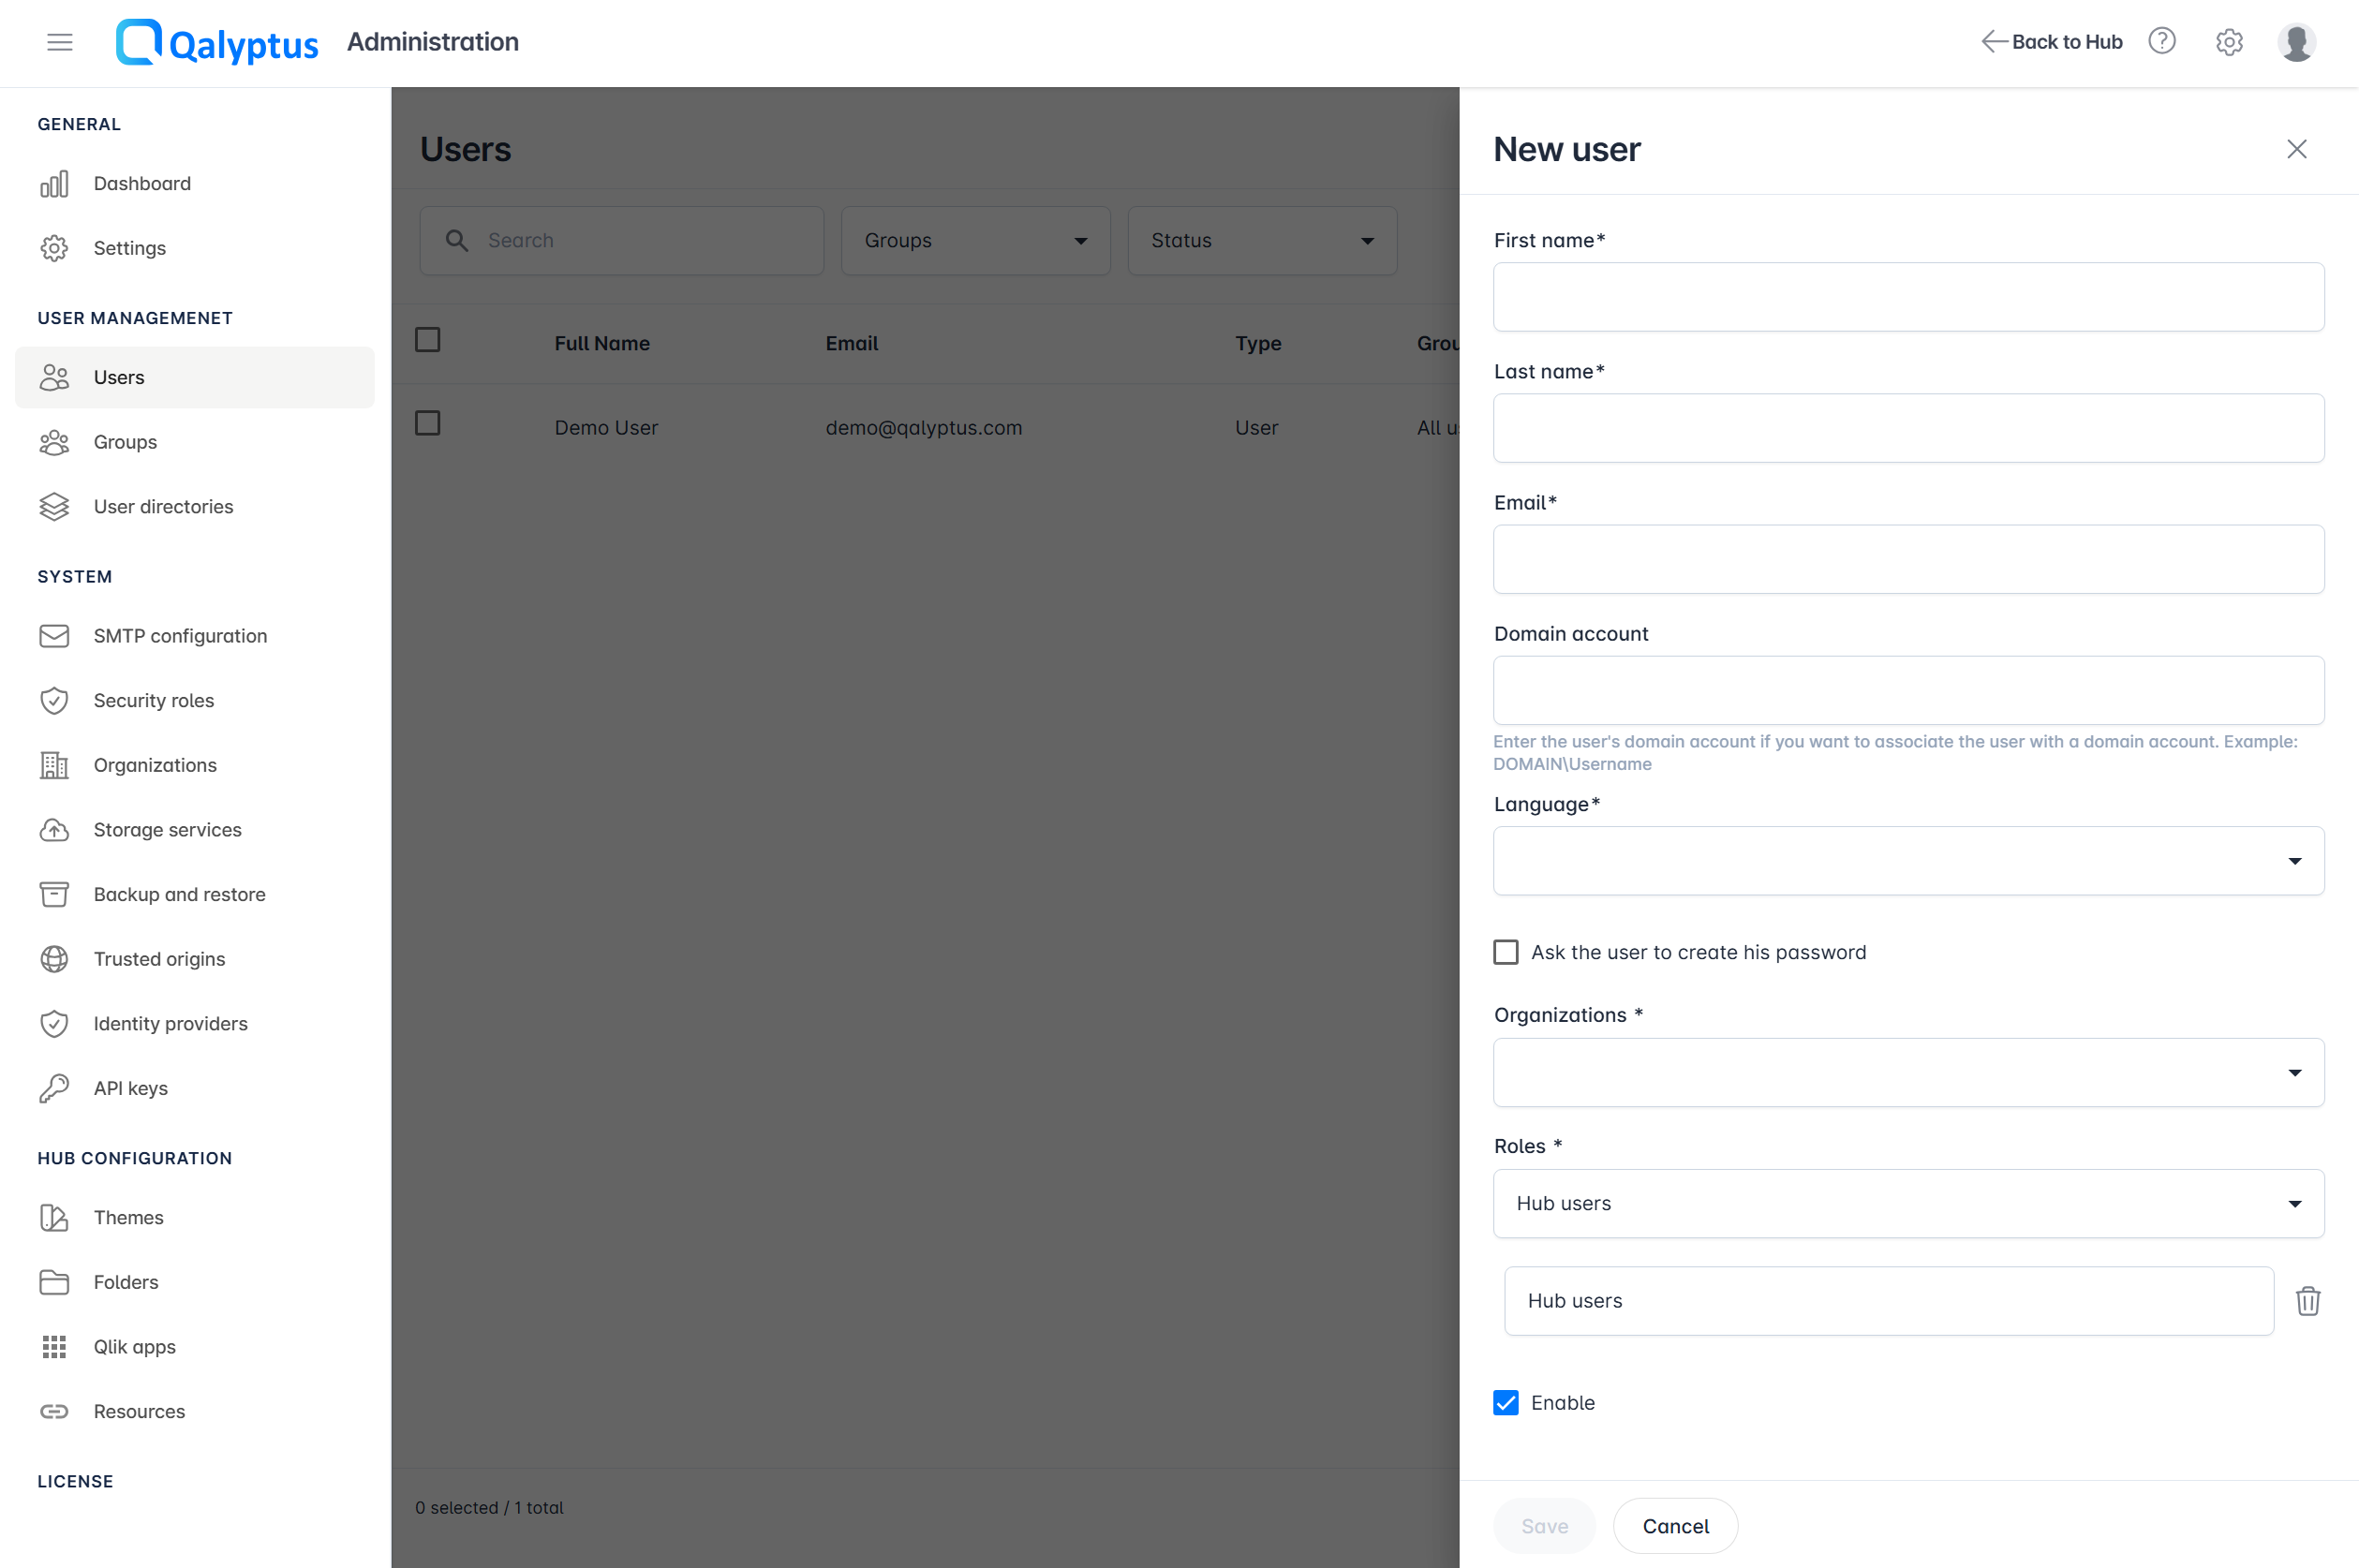
- Click Add users, then Create user.
- Enter the information in the following fields:
- First name
- Last name
- Email: User's email. It must be unique.
- Domain Account (optional and must be unique if not empty): The domain account is used to authenticate the user with Windows authentication and to link the Qalyptus Server user to the Qlik Sense user. This is necessary when you use Qalyptus Desktop without installing a certificate (using the Qalyptus Server engine) when users use Qalyptus extensions in Qlik Sense; Qalyptus uses the Qlik Sense profile to generate the report (Section access and other restrictions are considered).
- Language: Choose the language of the user. This option can be changed later in the user profile settings.
- Ask the user to create his password: Check this checkbox to send an e-mail to the user with a link allowing him to create his password to have his Qalyptus credentials. If you do not check this box, the user can create his password in the Qalyptus Server login interface by clicking on the “Forgotten password” link.
- Add at least one organization for the user.
- Add roles for the user.
- Enable: Choose to enable or disable the user's account.
- Click Save
Add a Recipient
For users who only need to receive reports via email:
- Navigate to Administration > User Management > Users
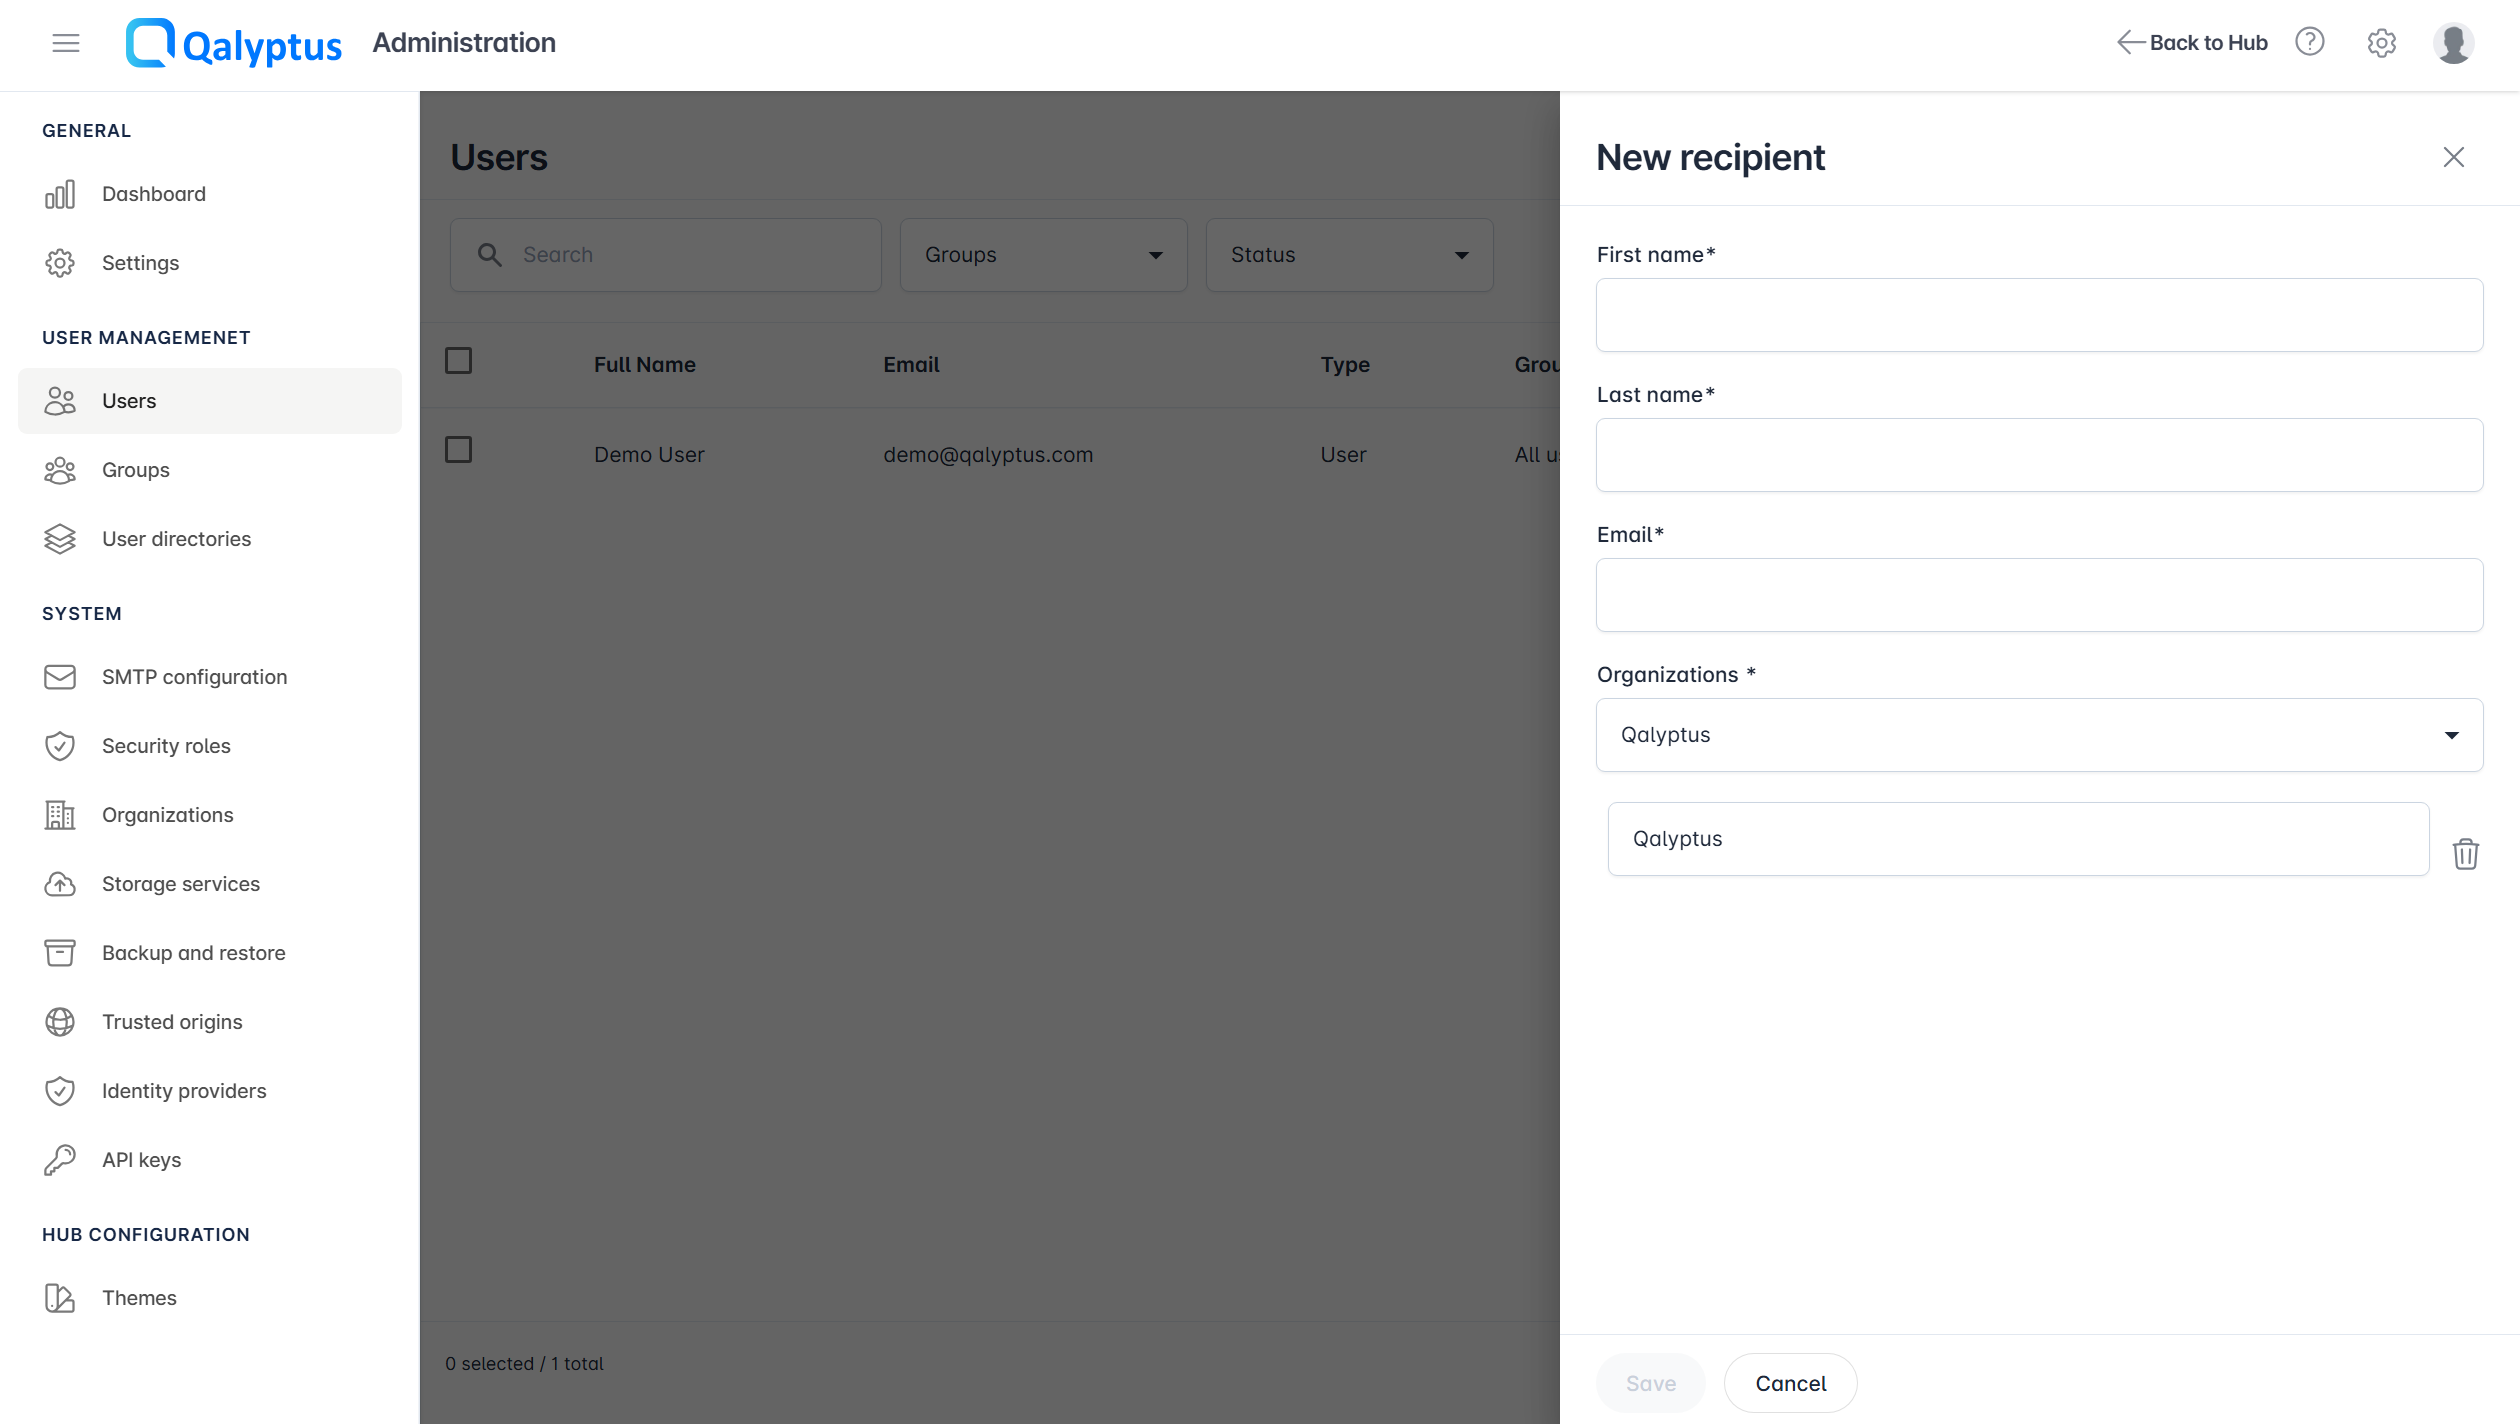
- Click Add users > Create recipient
- First name: Recipient's given name
- Last name: Recipient's family name
- Email: Unique email address (required)
- Organization: Assign to at least one organization
- Save Configuration
Bulk User Import
Excel Import Process
Below is how to import multiple users from an Excel spreadsheet.
- Navigate to Administration > User Management > Users
- Click Add users > Import from Excel
- Download the provided template
- Follow column format requirements (only first sheet is processed)
- Include all required user information
- Select Excel File: Browse to your prepared file
- Password Creation: Enable "Ask new users to create their password" if desired
- Click Import from Excel
- Review import results and any error messages
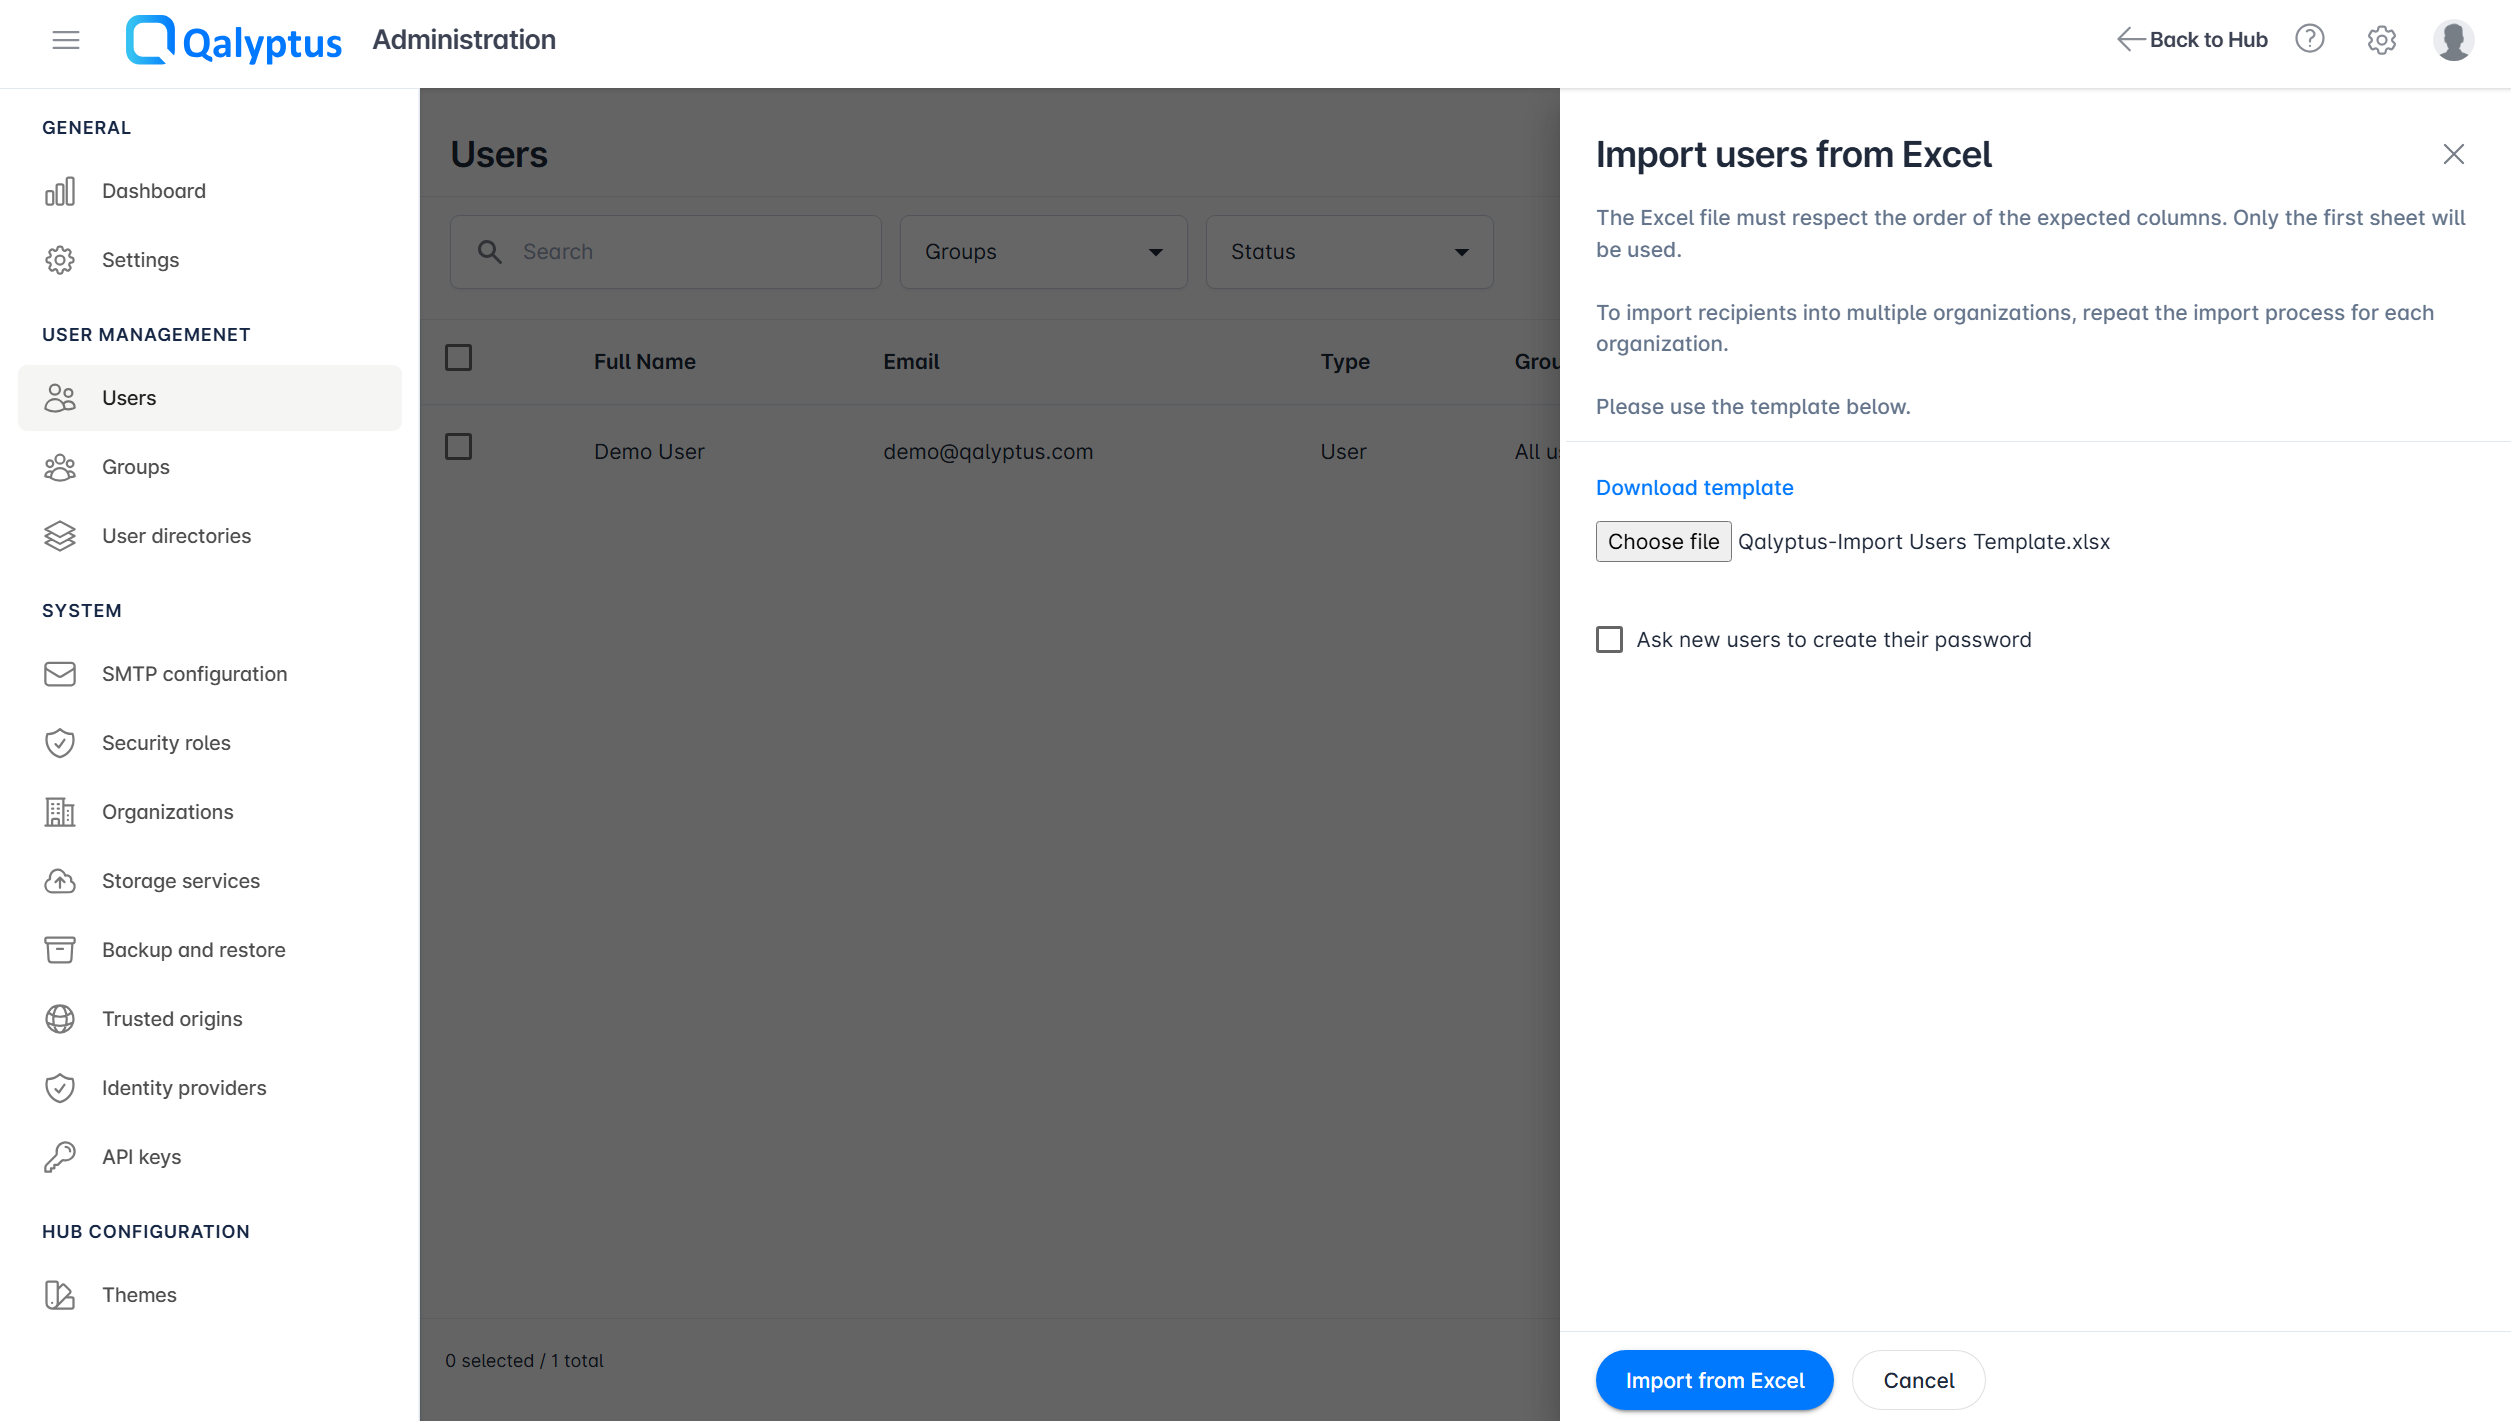
Use the provided Excel template to ensure proper column formatting. Only the first worksheet will be processed during import.
Directory Integration
Active Directory Synchronization
Integrate with on-premises Active Directory for automated user management:
Prerequisites
- Network connectivity to Active Directory server
- Appropriate AD service account (if authentication required)
- LDAP or LDAPS access configured
Configuration Steps
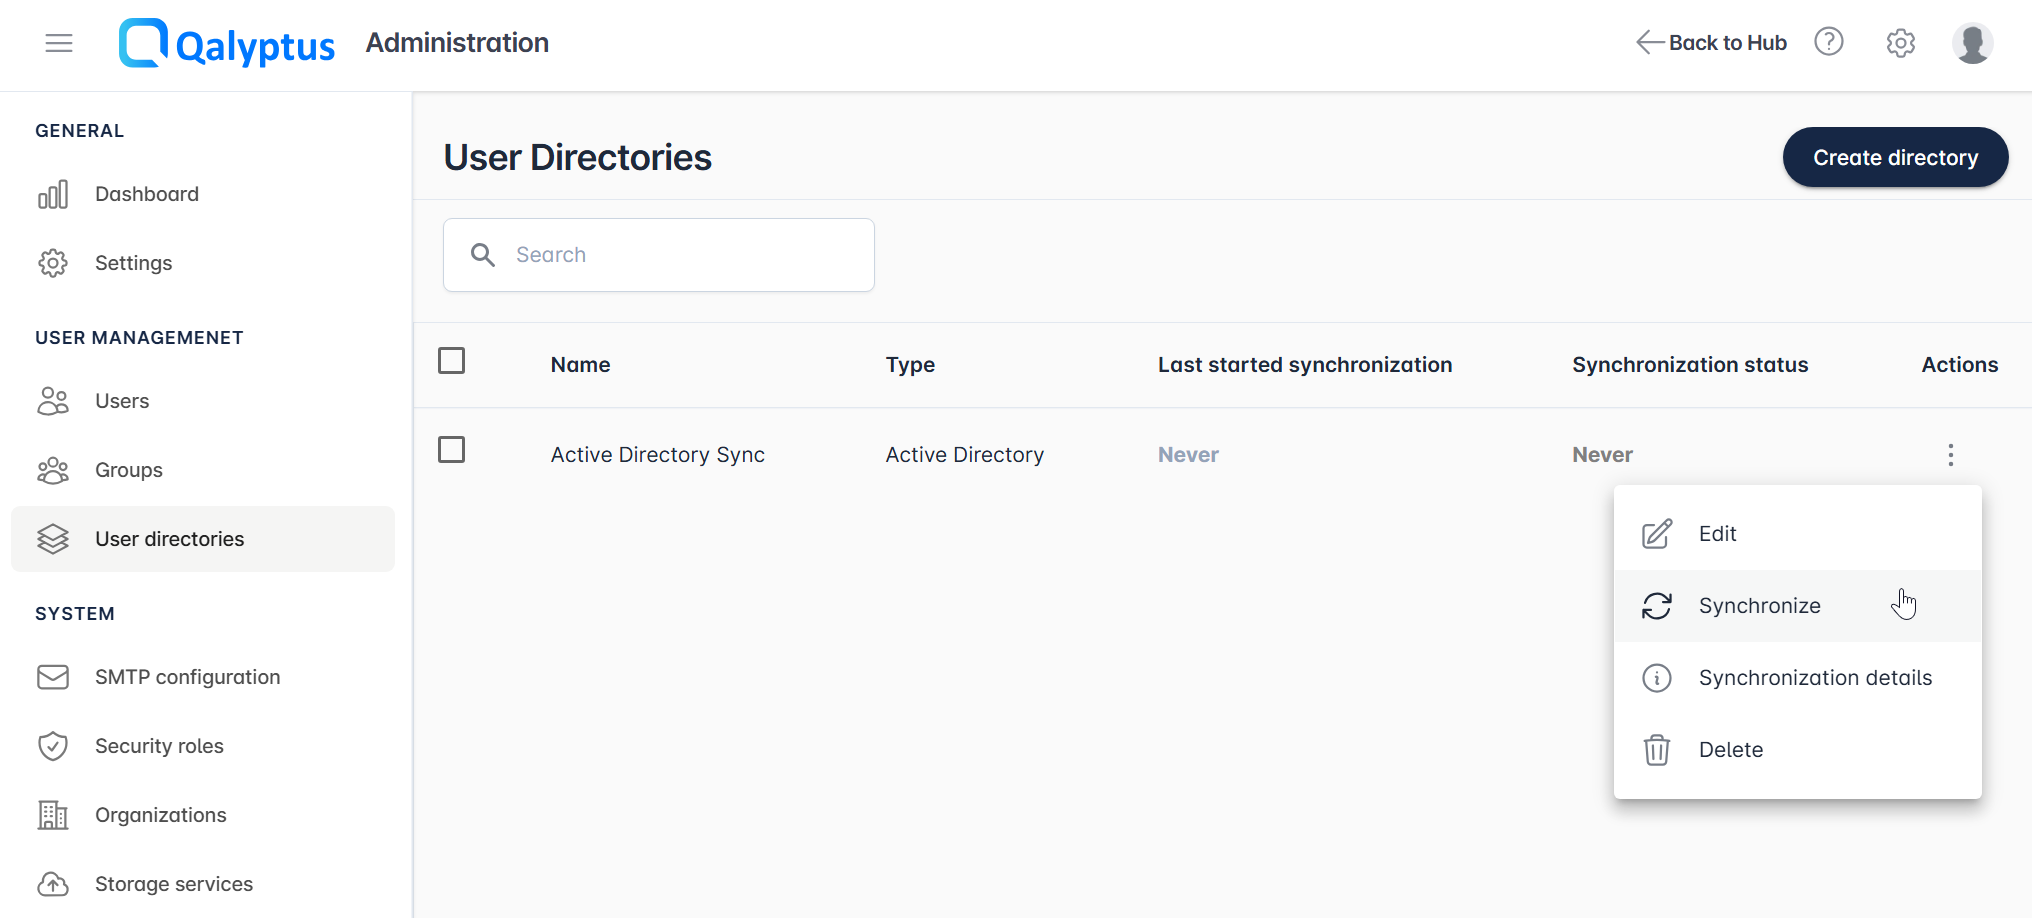
- Navigate to Administration > User Management > User Directories
- Click Create directory and Configure Active Directory Settings
- Name: Directory identifier
- Group Prefix: Prefix for synchronized groups (optional)
- Type: Select "Active Directory"
- Path: LDAP connection string
- Standard:
LDAP://{your-ldap-server} - Secure:
LDAPS://{your-ldap-server}:636
- Standard:
- Username: Active Directory service account (Optional)
- Password: Service account password (Optional)
- LDAP Filter: Additional user filtering criteria (Optional)
- Organization: Target organization for imported users
- Default Role: Automatic role assignment (optional)
- Password Creation: Email password creation links to new users
- Synchronization Schedule
- Manual: On-demand synchronization only
- Automatic: Scheduled synchronization
- Frequency: Daily, weekly, or monthly
- Time: Specific time and timezone
- Save and Test Configuration
Managing Synchronization
Manual Synchronization:
- Navigate to Administration > User Management > User Directories
- Click the Action menu for your Active Directory
- Select Synchronize
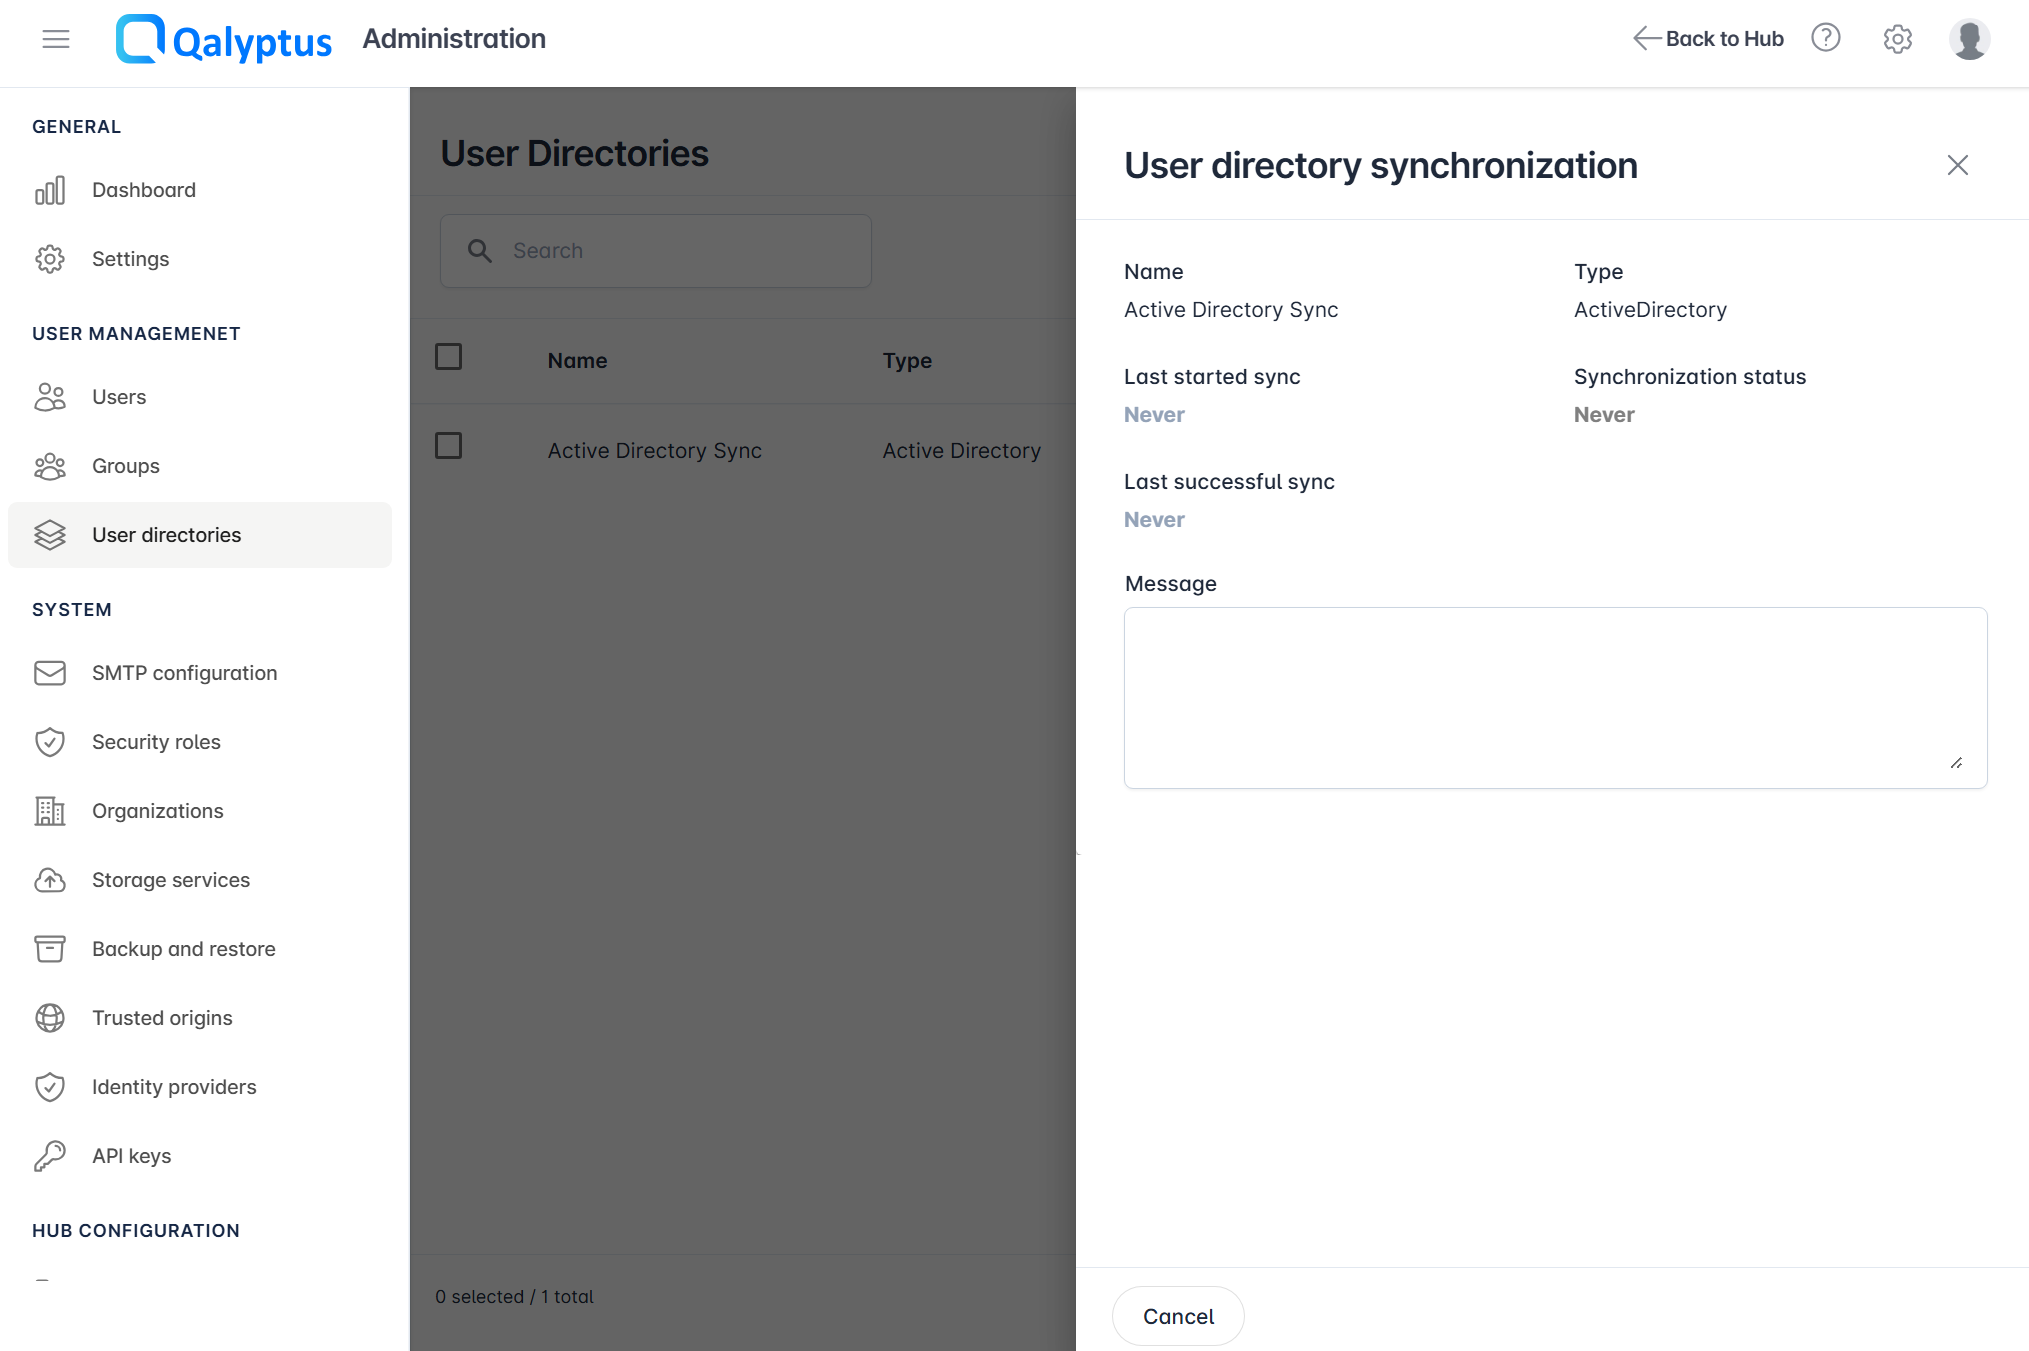
Monitor Synchronization:
Click Synchronization Details to view:
- Last synchronization attempt
- Synchronization status
- Success/error messages
- User and group import results
Active Directory groups are automatically created in Qalyptus when they contain at least one synchronized user.
Microsoft Entra ID Integration
Synchronize users and groups from the cloud-based Microsoft Entra ID (formerly Azure AD).
Prerequisites
- Microsoft Entra ID tenant access
- Registered application in Entra ID with API permissions
- Client secret or certificate for authentication
Before configuring Entra ID integration, register an application in your Microsoft Entra ID tenant with appropriate Microsoft Graph API permissions.
Configuration Steps
- Navigate to Administration > User Management > User directories
- Click Create directory and Configure Microsoft Entra ID Settings
- Name: Directory identifier
- Group Prefix: Prefix for synchronized groups (optional)
- Type: Select "Microsoft Entra ID"
- Application ID: Entra ID app registration client ID
- Directory ID: Entra ID tenant ID
- Client Secret: Application secret key for authentication
- Organization: Target organization for imported users
- Default Role: Automatic role assignment (optional)
- Password Creation: Email password creation links to new users
- Synchronization Schedule
- Manual: On-demand synchronization only
- Automatic: Scheduled synchronization
- Frequency: Daily, weekly, or monthly
- Time: Specific time and timezone
- Save and Test Configuration
Managing Entra ID Synchronization
Manual Synchronization:
- Navigate to Administration > User Management > User directories
- Click the Action menu for your Microsoft Entra ID directory
- Select Synchronize
Monitor Synchronization:
Click Synchronization Details to view:
- Last synchronization attempt
- Synchronization status
- Success/error messages
- User and group import results
Microsoft Entra ID groups are automatically created when they contain at least one synchronized user.
Important Considerations
Synchronization Behavior
- One-Way Sync: Updates flow from Active Directory/Entra ID to Qalyptus Server only
- User Updates: Existing users in Qalyptus are updated with current directory information (email as ID)
- User Creation: New users found in directory are automatically created in Qalyptus
- No Automatic Deletion: Users deleted from either Qalyptus or the directory are not automatically removed from Qalyptus
- Configuration Persistence: Deleting directory configuration retains synchronized users and groups
Best Practices
- Test Integration: Verify directory connectivity before production deployment
- Monitor Synchronization: Regularly review synchronization logs for errors
- Role Management: Define appropriate default roles for automated user creation
- Backup Strategy: Maintain backups before major synchronization changes
Troubleshooting
Common Issues:
- Authentication Failures: Verify service account credentials and permissions
- Connection Errors: Check network connectivity and LDAP/LDAPS configuration
- Import Failures: Review LDAP filters and organizational mappings
- Password Issues: Ensure SMTP configuration for password creation notifications
- Detailed Error Analysis: Check the Qalyptus Server log files for comprehensive synchronization details and error messages