Add reports
Add reports, set formats, save to cloud storage
Overview
To add reports to a task, do the following:
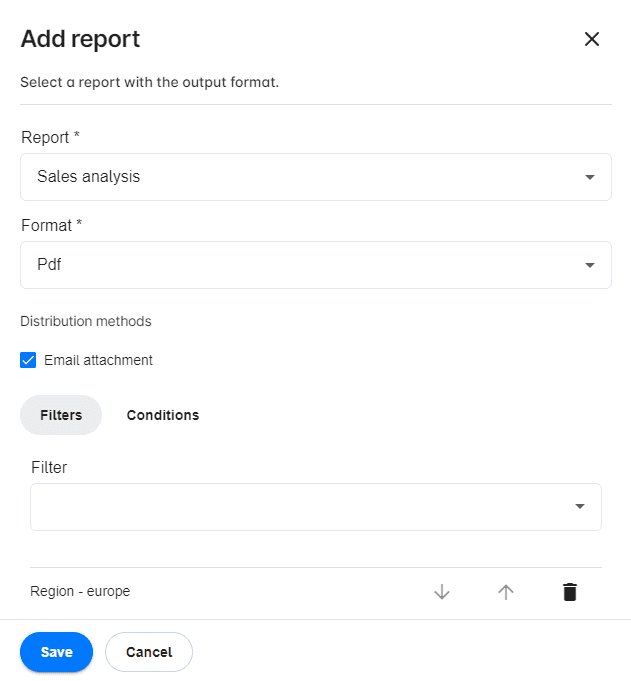
- After creating a task, go to the Reports tab
- Click Add report.
- Select a report from the available report list
- Select the report output format from the available formats.
You can choose for each report how you want to distribute it:
- Email attachment
- Email embedment (for HTML reports)
You can apply Filters and Conditions previously created to the report. Note that the order of the added filters is important. Use the arrows to order.
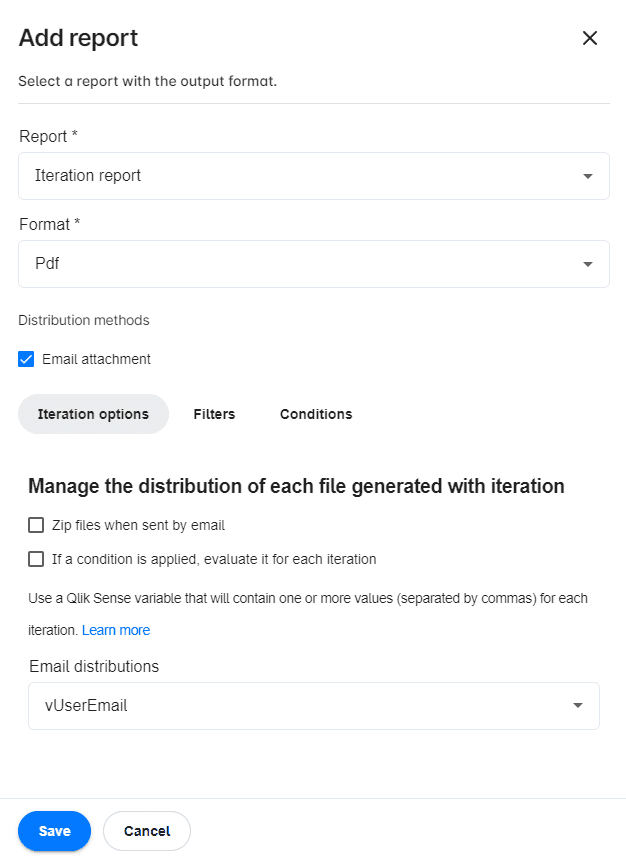
- If the selected report is a report that contains an Iteration, other options are displayed.
- Zip files when sent by email: If you check this checkbox, the reports sent as an email attachment will be grouped in a zip file.
- If a condition is applied, evaluate it for each iteration: If you check this checkbox, Qalyptus will evaluate the report's conditions before generating each file.
- Email distribution: This option allows you to use a Qlik Sense variable to email each file created during an Iteration to one or more recipients. Go to the section below to see how to send the same report with different data to different recipients.
Save reports in cloud storage services
You can store the report files in different storage services: FTP, SFTP, SharePoint, OneDrive, Google Drive, and Dropbox.
You can save the same report to multiple storage services or locations within the same service.
- On the Tasks page, create or edit a task
- Go to the Reports tab
- Add a new report or edit an existing one
- Click on the Storage services tab
- Select a storage service from the list
- Enter the path to the folder where you want to save the report files
- Click Save
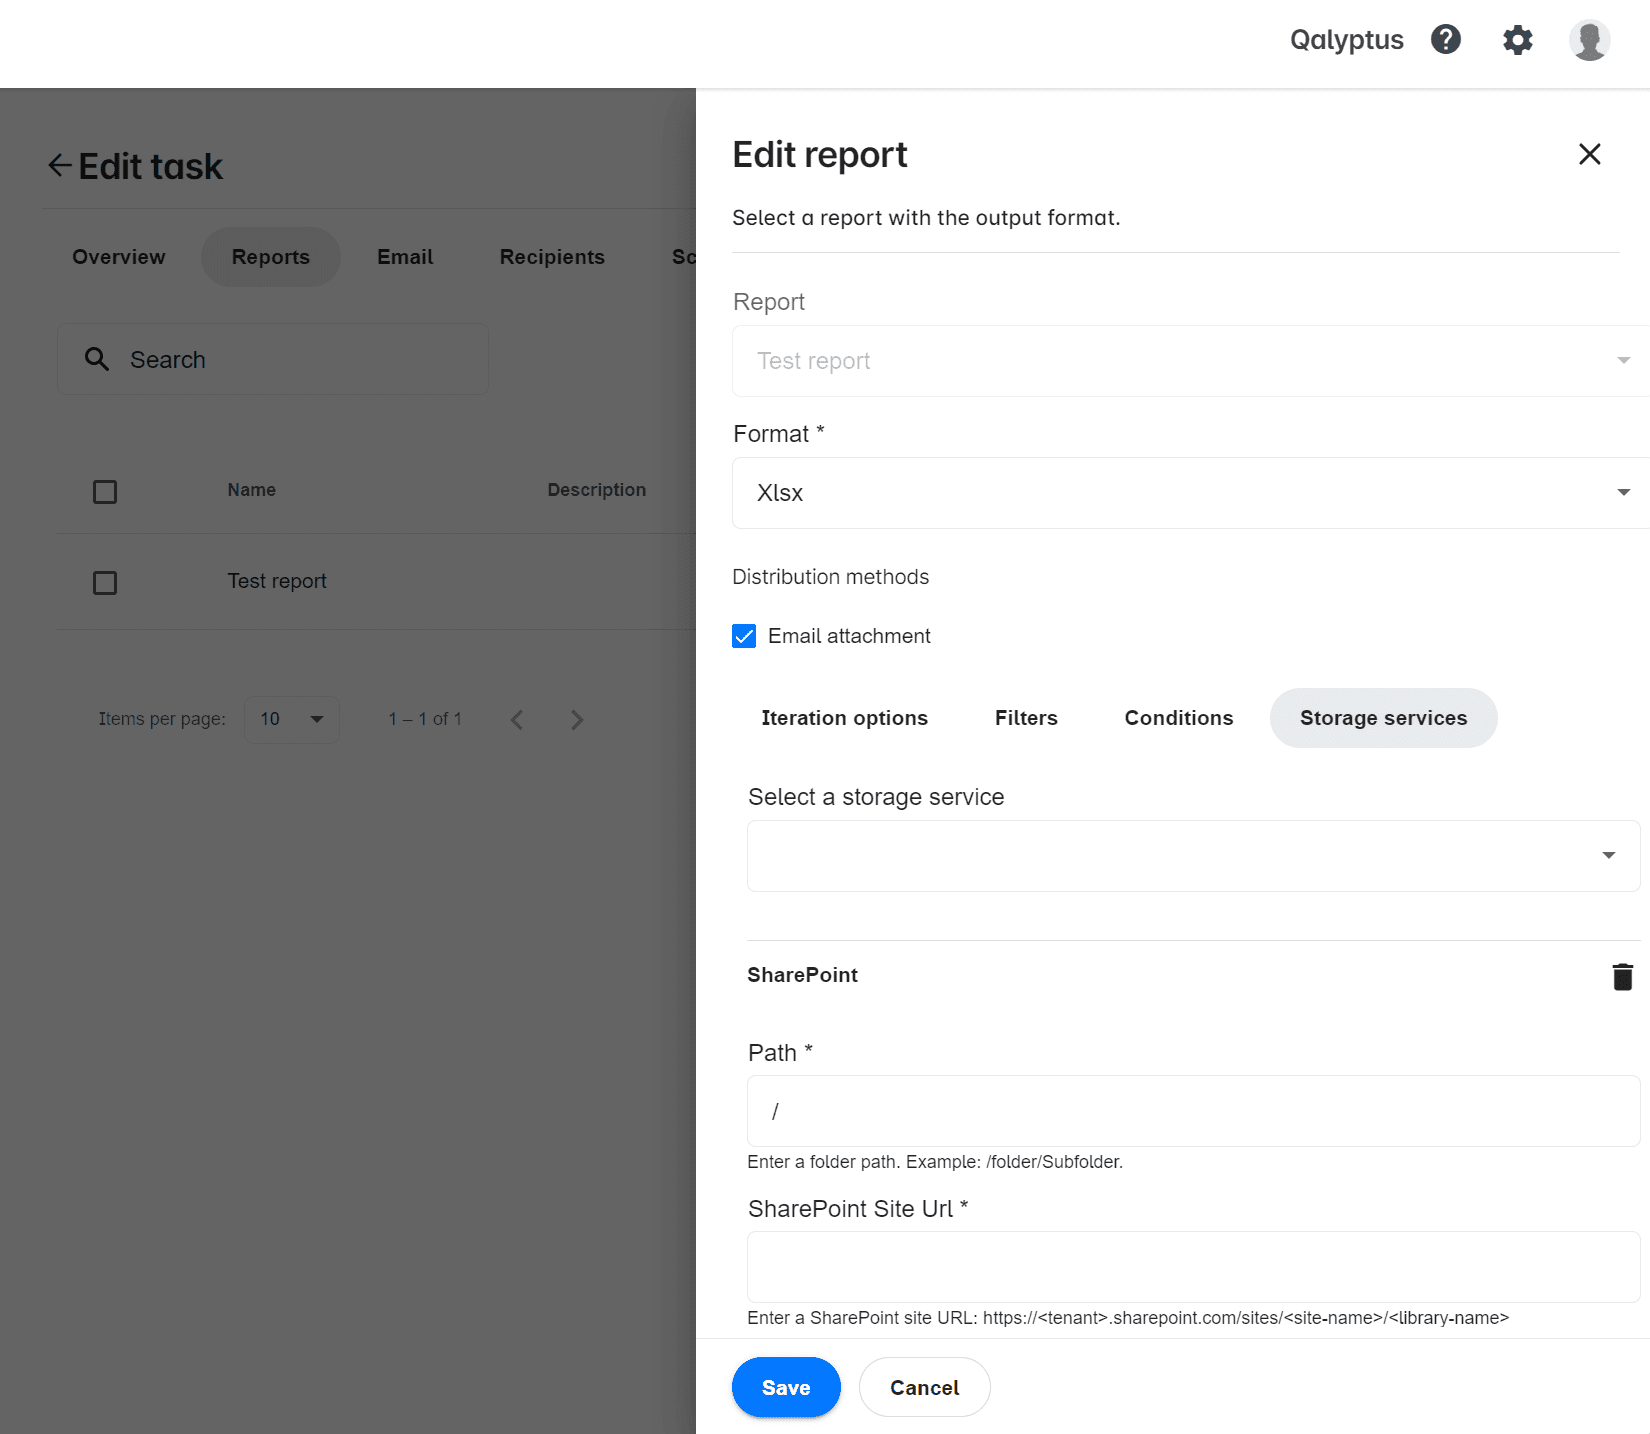
The path syntax varies by service.
- For FTP, SFTP, SharePoint, and OneDrive, the path must be in the following format: /folder/subfolder
- For Google Drive, you need to enter the Google Drive folder ID. After opening the Google Drive folder in a browser, the folder ID appears at the end of the URL.
For SharePoint, in addition to the folder path, you must specify the site URL with the following format: https://{tenant}.sharepoint.com/sites/{site-name}/{library-name}.
The Storage Services must be created beforehand in Your profile > Storage Services.
Send the same report to different recipients with different data
In this section, we will see how to filter by a recipient to send the same report but with different data for each recipient.
1. Create an Iteration report
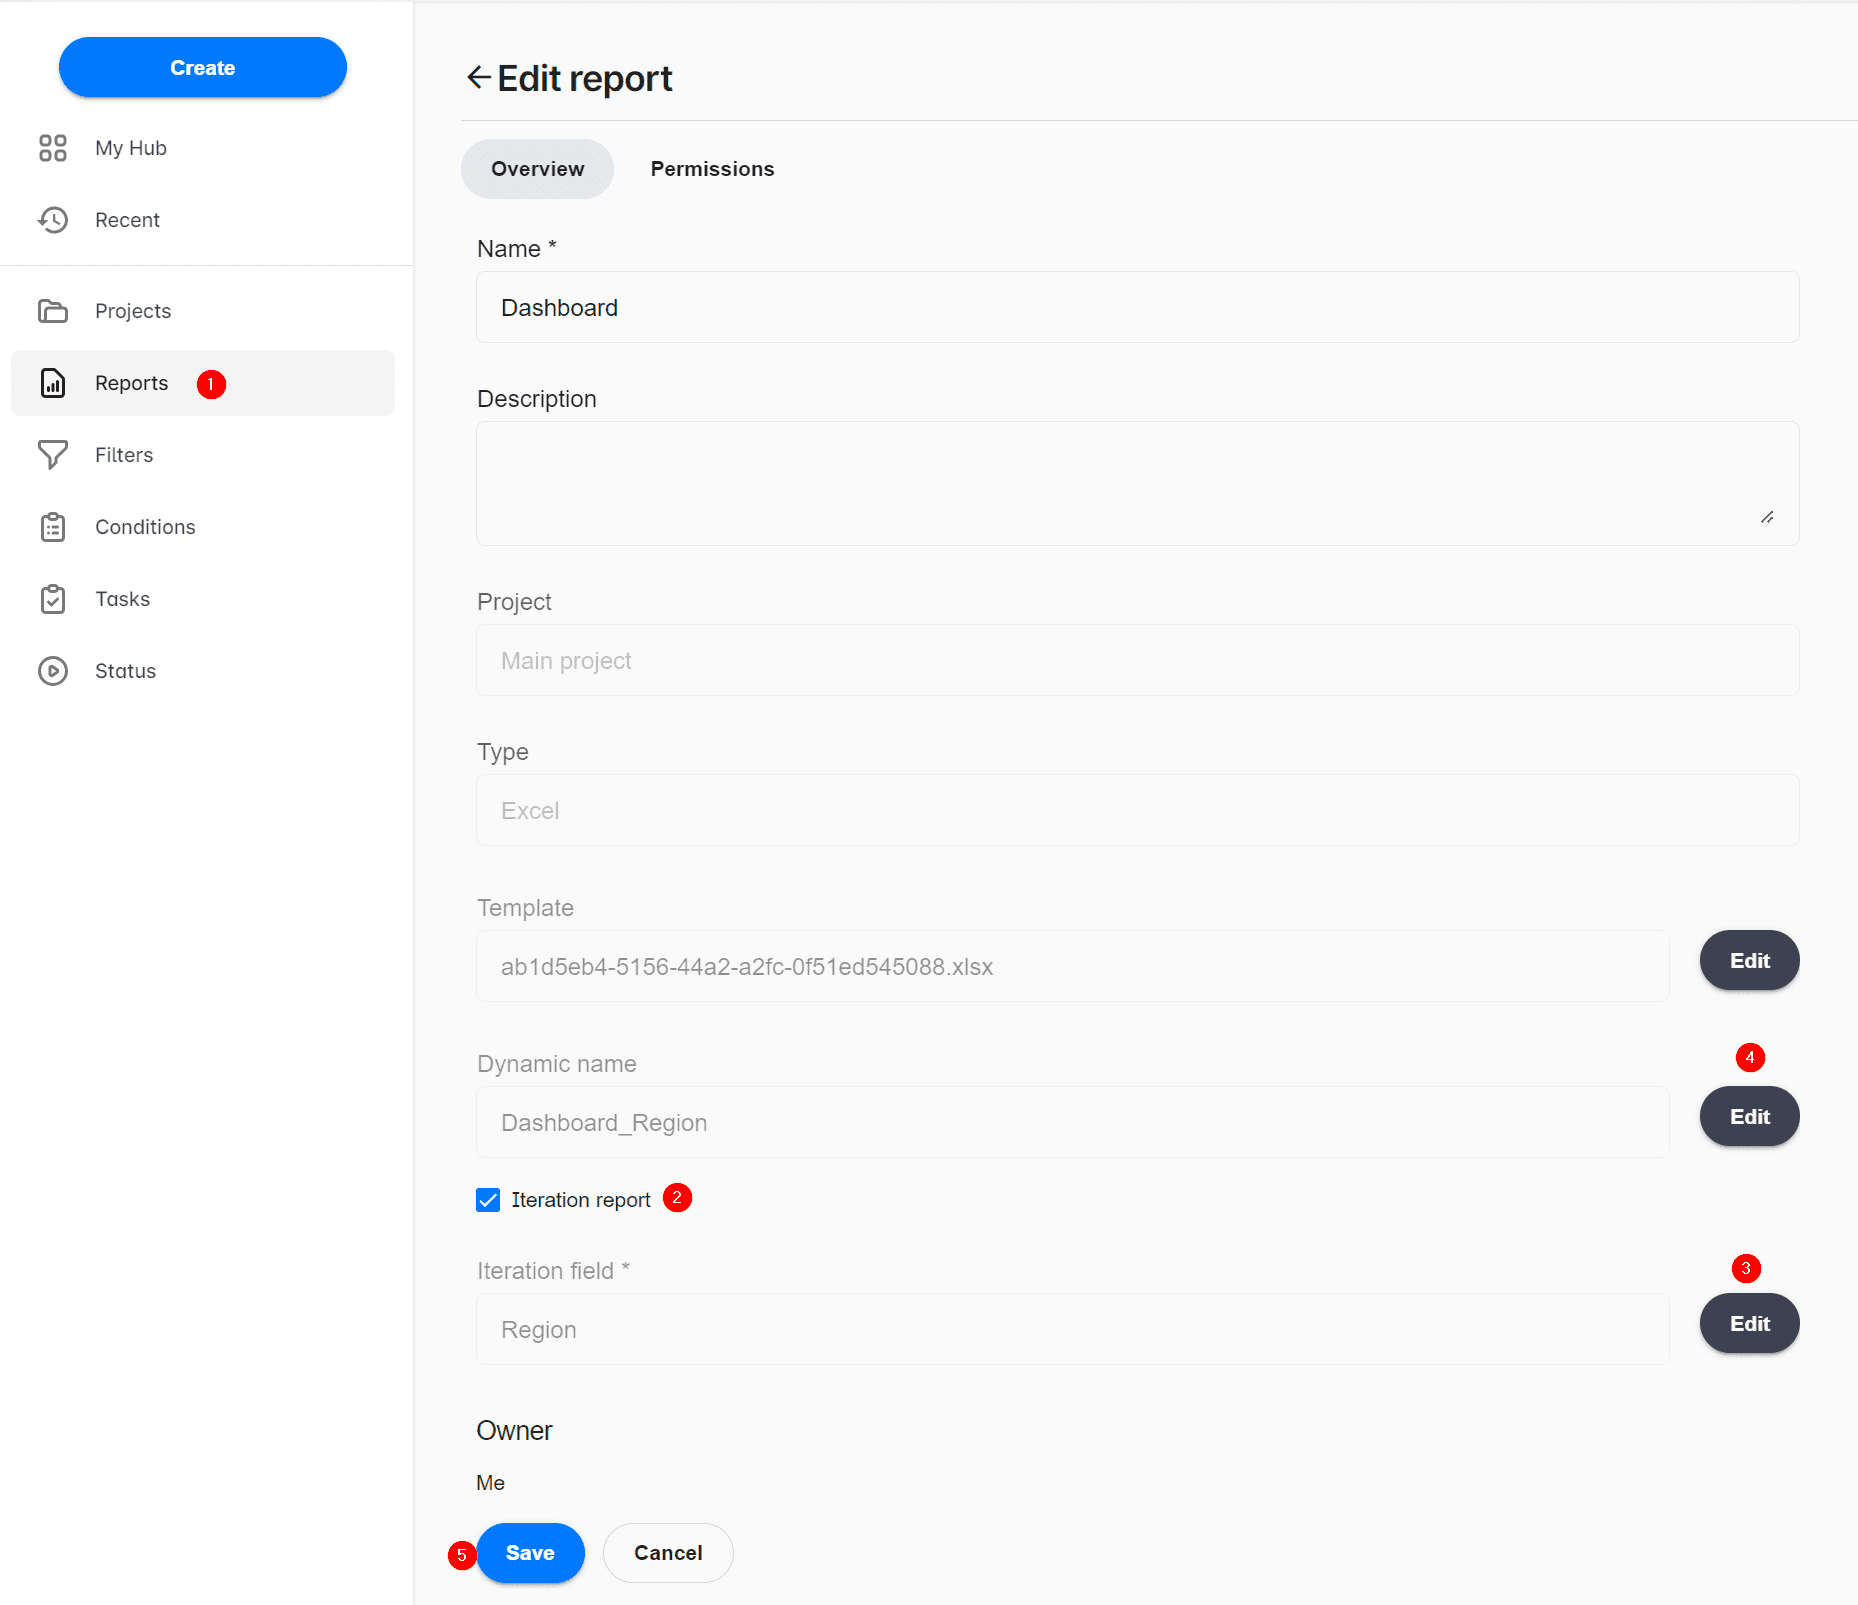
Start by creating a report in Qalyptus Cloud and choose the option Iteration report. This option allows you to loop through a field to generate multiple reports. Remember to add a Dynamic name to the report; having a unique name for each file is important.
2. Add the recipients' email in your Qlik Sense app
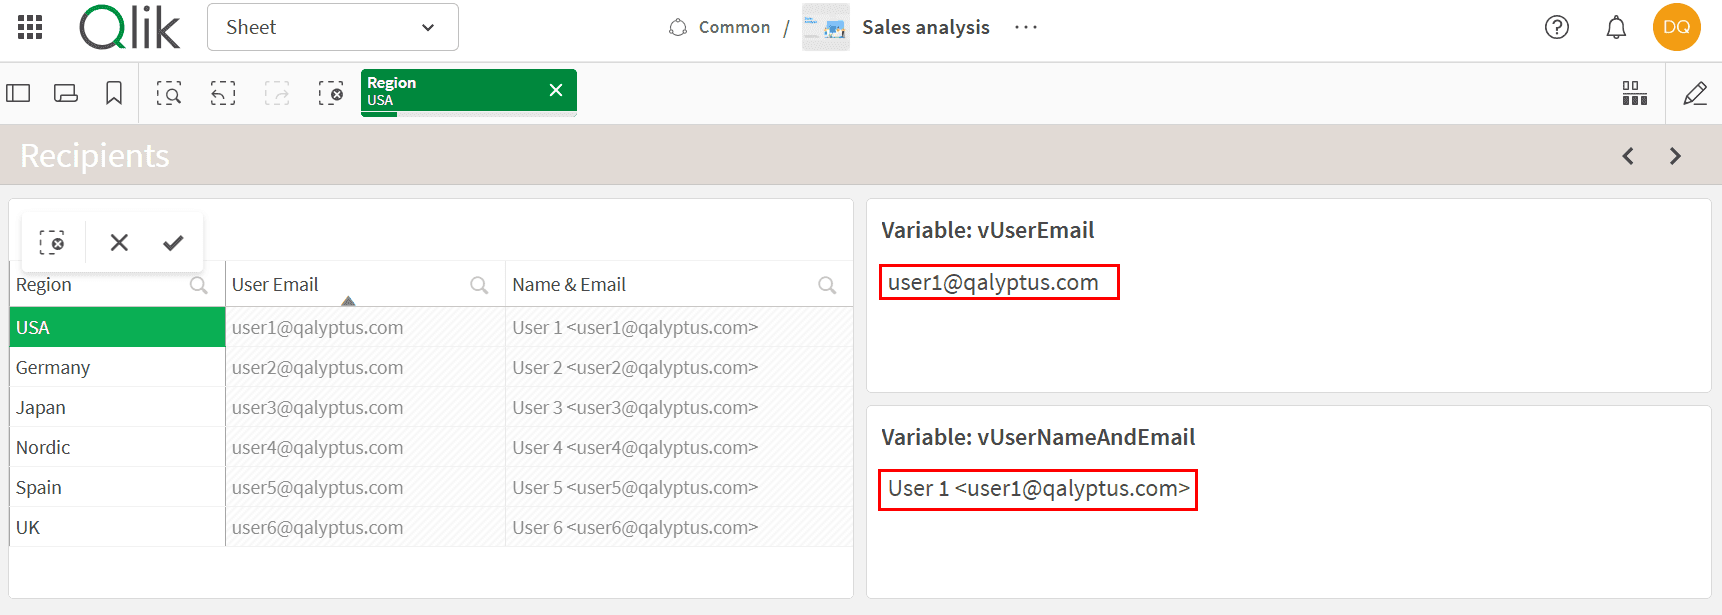
In the Qlik Sense app used to create the report, load the recipients' email addresses and link the E-mail address field to the Iteration field chosen in your Qalyptus report. You can add the email addresses in different ways: Load the email addresses from your database, from an Excel file, from an Inline[] table, etc.
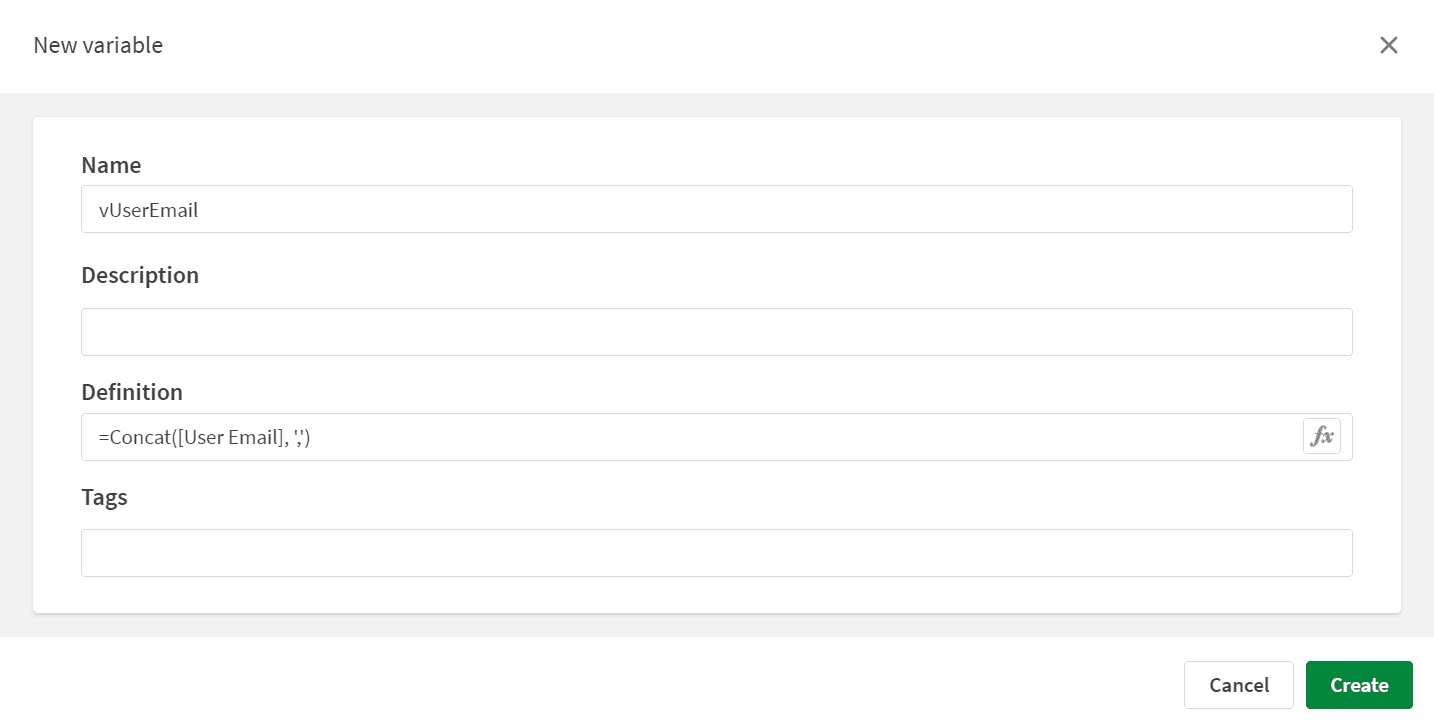
3. Create a variable for the emails
Once you have the recipients' email addresses in the Qlik Sense app, create a variable that returns the email address linked to each value of the Iteration field. The variable can return one or more email addresses separated by a comma. The variable expression can look like this: =Concat([E-mail address], ',')
4. Add the report to a task
At this step, you have everything you need to set up the distribution of the report to multiple recipients by filtering the data by recipient.
4.1. Refresh the app metadata
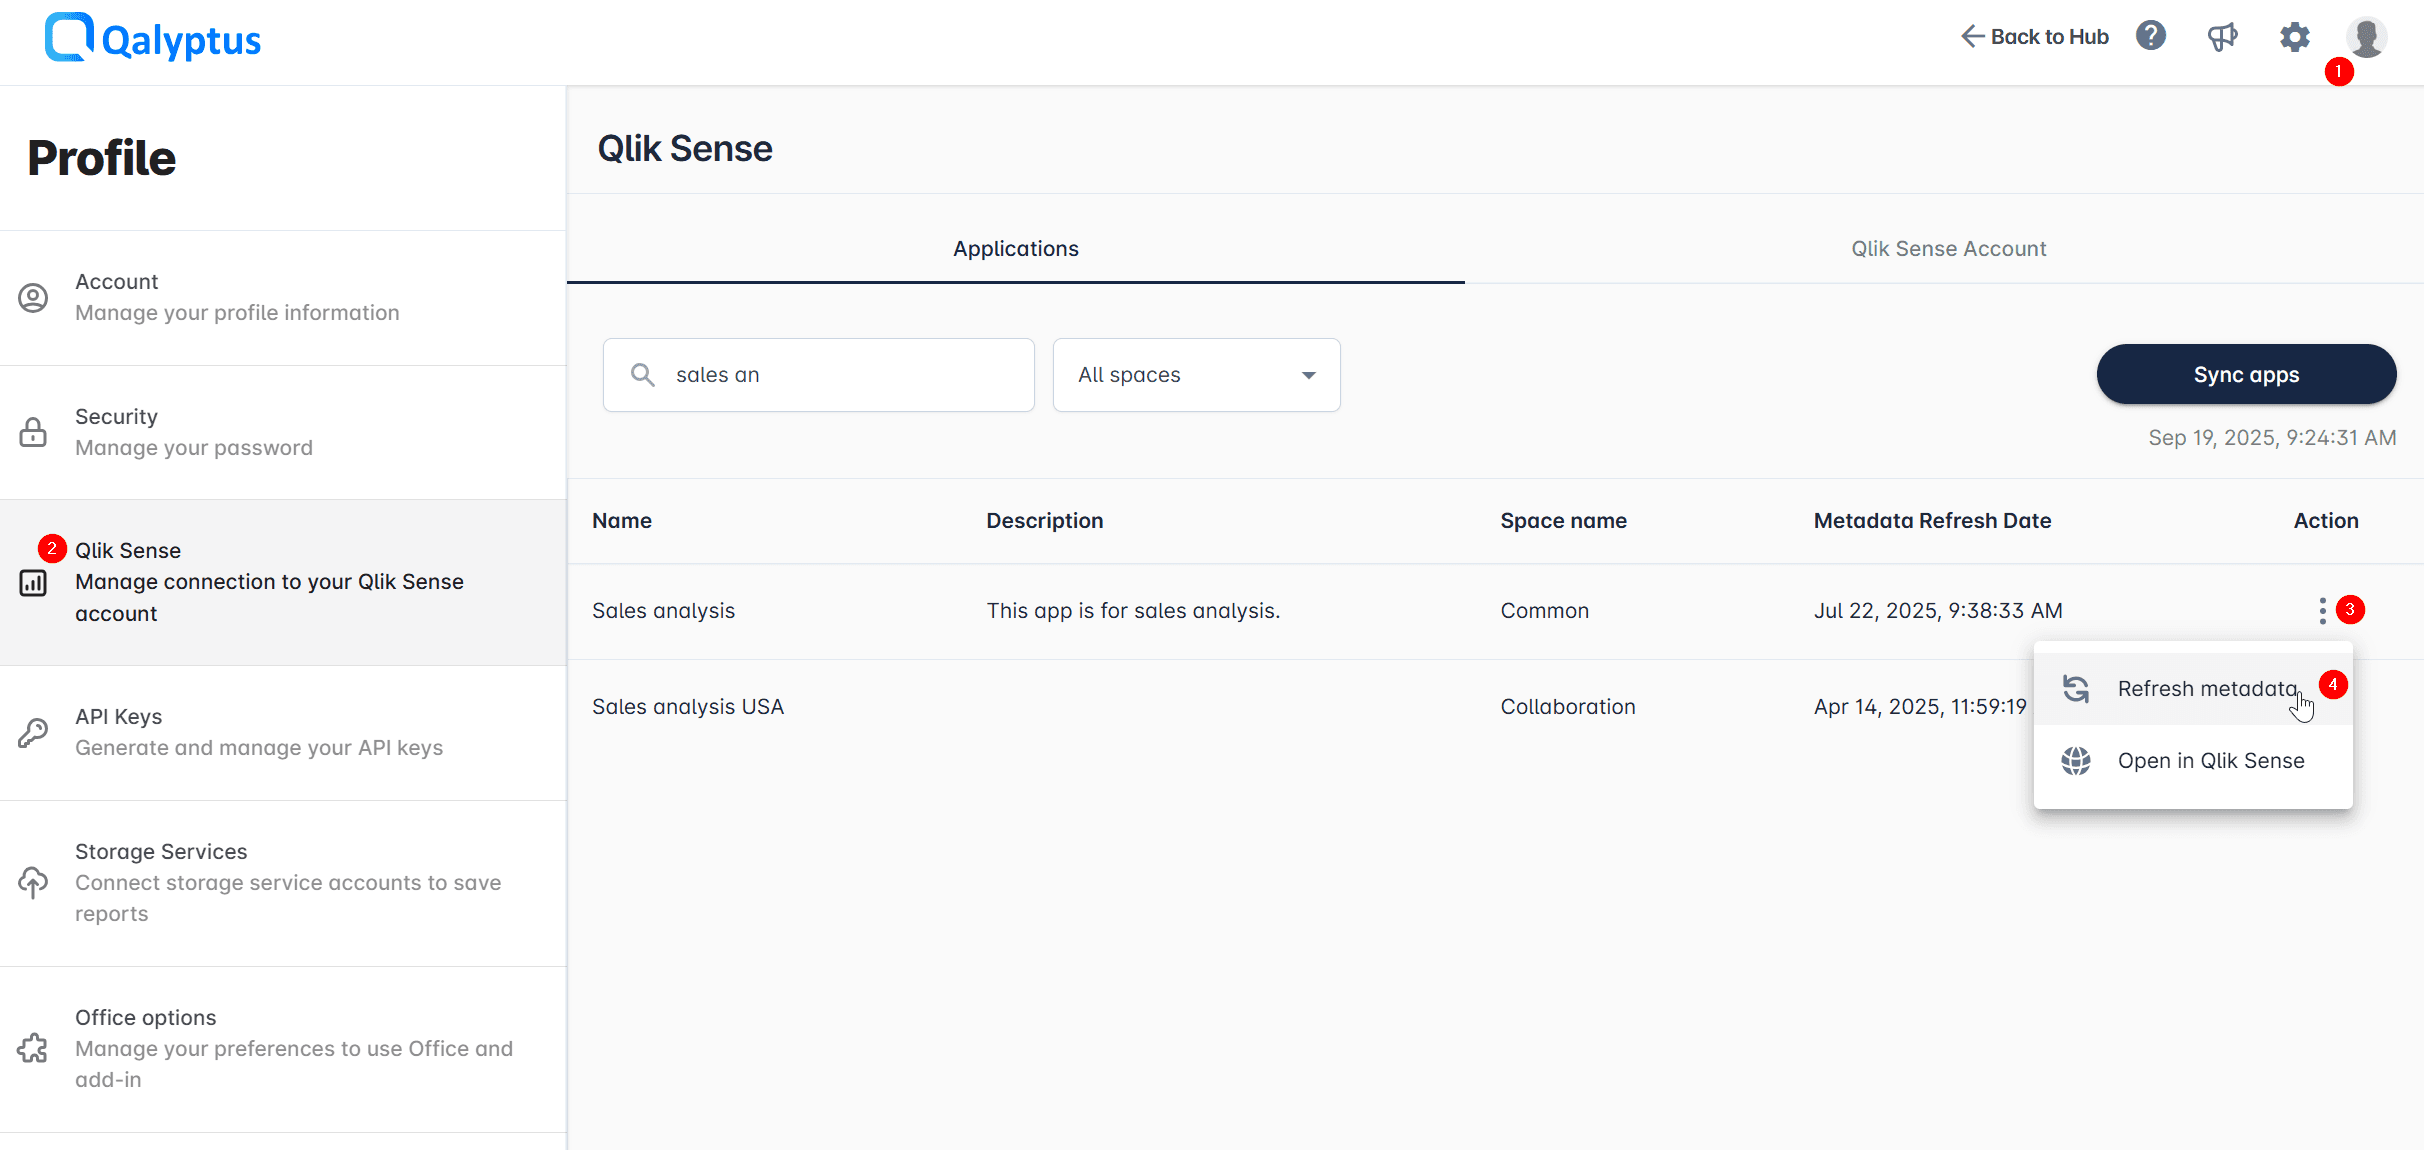
You need to refresh the app metadata to see the new variable.
- In Qalyptus Cloud, click the avatar in the upper right corner of the screen > profile
- Go to the Qlik Sense section
- Stay in the Applications tab
- Click the app's three-dot action button
- Click Refresh metadata to refresh the app metadata
4.2. Add the report to a task
- In Qalyptus Cloud, go to Tasks
- Create a new task or edit an existing task
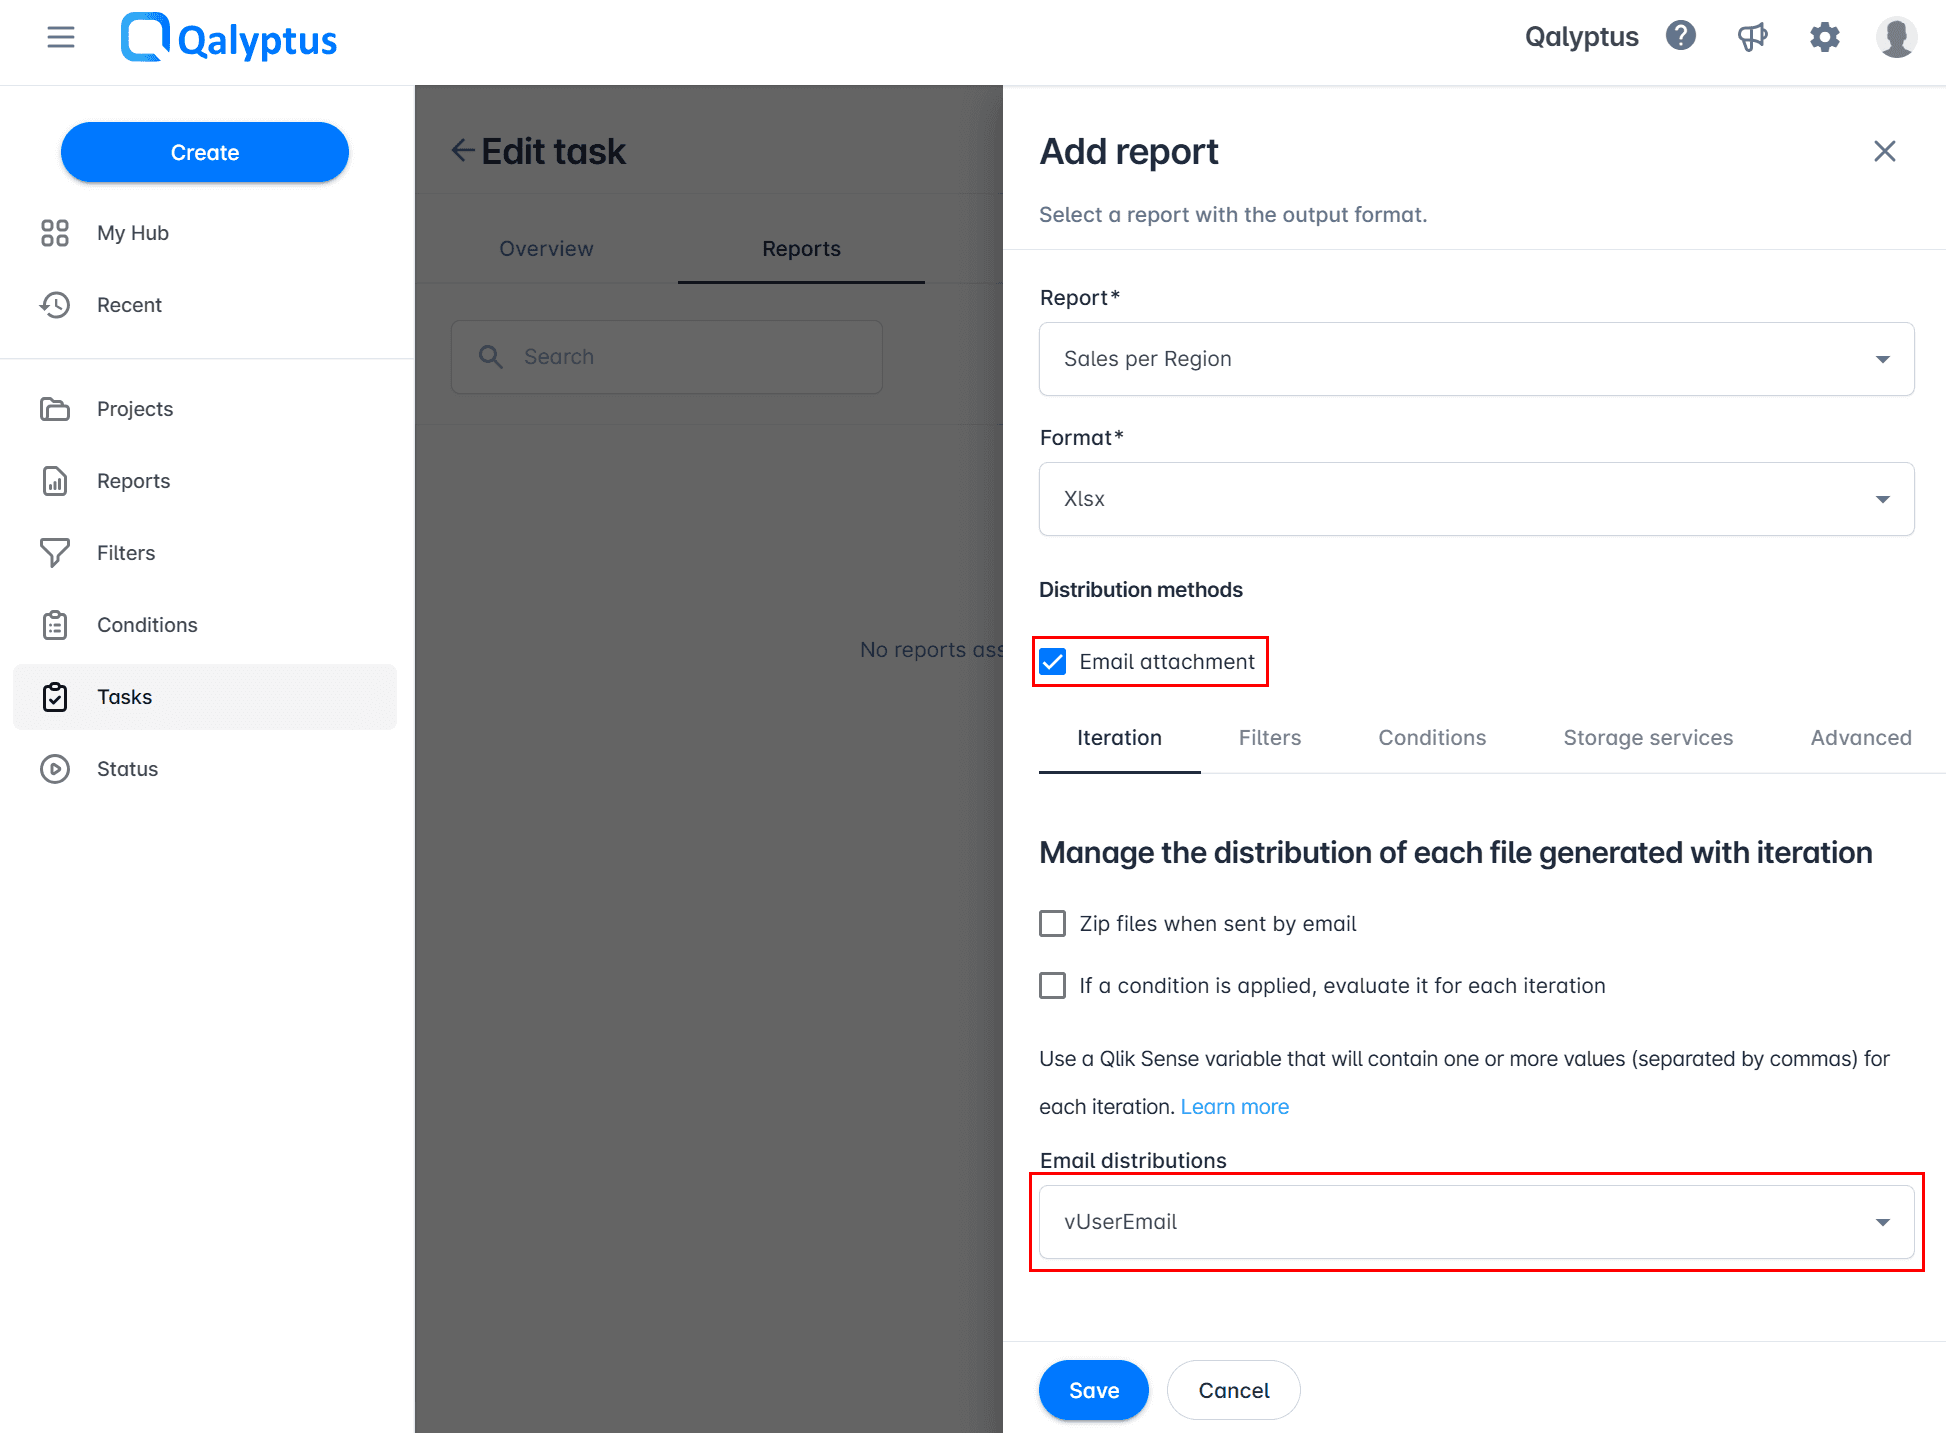
- In the Reports tab, click Add report
- Select the report and the output format
- Check the Attachment option to attach the file
- In the Iteration options section, select the previously created variable in the Email distribution drop-down list
- Click Save
After the task execution, each recipient will receive one or more reports.
We recommend that you enable the Test mode in your task to validate the result before sending the reports to the recipients.
Two scenarios are possible:
Suppose you have sales reps linked to one or more offices.
- To send one or more report files to a sales rep, choose the Sales rep field as the Iteration field.
- To send a single report file with the data of one or more offices, choose the E-mail address field as the Iteration field.
Qalyptus will send an email to each user even if the user has more than one report. All the user's reports will be attached in the same email.
If you want to send separate emails to a user who should receive several reports, use a tag (+xxx).
Example:
Before
| Office | |
|---|---|
| USA | [email protected] |
| USA | [email protected] |
| UK | [email protected] |
Qalyptus will send two emails. User 1 will receive one email with two reports.
After
| Office | |
|---|---|
| USA | [email protected] |
| USA | [email protected] |
| UK | [email protected] |
Qalyptus will send three emails. User 1 will receive two separate emails.